
Maria is a Content Writer with a keen interest in Technology and Productivity Tools. Her articles can be found on sites such as Onlinetivity and Delesign. Outside of work, you can find her mini-blogging about her life on social media. Learn about our Tech Review Board
Updated August 29, 2024 Reviewed & Updated by Afam Onyimadu Contributor Expertise: Microsoft, R, SQLAfam has been a content writer with Guiding Tech Media since August 2023. However, his experience in tech writing dates back to 2018, when he worked as a freelance writer for Make Tech Easier. Over the years, he has grown a reputation for publishing quality guides, reviews, tips, and explainer articles. His work is featured on top websites, including Technical Ustad, Windows Report, and Next of Windows. He has training as a Microsoft Certified Professional and has covered more Microsoft-related guides on these platforms. Learn about our Tech Review Board
By default, Google Docs’s page setup is Pages. In this setup, you can turn text blocks into columns. Adding columns is an easy trick to enhance your document’s readability. Here’s how.
Step 1: Open Google Docs in your preferred browser and sign in with your details.
Step 2: Open the document where you want to introduce text columns on the Google Docs home page.
Step 3: Highlight the text on the Google Docs canvas to convert it into columns.
Step 4: On the Google Docs Ribbon, click the Format tab.

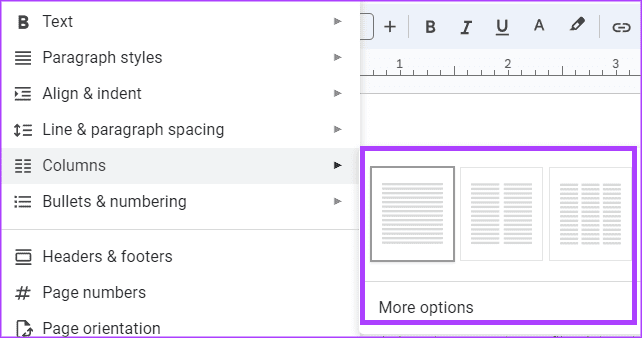
Step 5: Click Columns from the option shown.

Step 6: Select the number of columns you want the text split into. The default options available are 1, 2, or 3 columns. The maximum number of columns you can introduce is 3.
You can edit the column format in Google Docs to remove, reduce, or increase the number of columns within the document. Here’s how to do so:
Step 1: Select the columns in the Google Docs you want to change.

Step 2: On the Google Docs Ribbon, click the Format tab.
Step 3: Click Columns.
Step 4: If you want to reduce or increase the number of columns, choose from the options 1, 2, or 3 columns.
After converting your text into the preferred number of columns, you can also change the spacing between the columns. In addition, you can decide to include a line to show the boundary between columns. Here’s how to do so:
Step 1: Select the columns in the Google Docs you want to change.
Step 2: On the Google Docs Ribbon, click the Format tab.
Step 3: Click Columns from the option shown.
Step 4: Click More Options from the Columns list.
Step 5: Enter your preferred Spacing option in the Column options dialog box.

Step 6: Check the box for Line between columns.
Step 7: Click Apply to save your changes.

Column breaks are useful in documents with text columns to indicate where text should stop. If your document is divided into two columns, inserting a column break ends the active column, moving the text cursor and any text after it to the top of the next column. This helps to control the flow of text within the document. Here’s how to insert a column break in Google Docs:
Step 1: Select the part of the column in Google Docs that you want to add a break.
 Selecting a column part" width="1380" height="714" />
Step 2: On the Google Docs Ribbon, click the Insert tab.
Step 3: Click the Break option shown.

Step 4: Click Column break.